![]()
Using eSync in a Multi-site Environment
If you want to use eSync in a multi-site environment, you must do so before the initial synchronization of a configuration. That is, you cannot set up a eSync configuration in a single-site environment and then later change to multi-site. You can set up a new configuration at any time.
Limitations on Using eSync in a Multi-site Environment
In a multi-site environment, you cannot create a staging site from a production site (as described in ”Using eSync to Initialize a New Site). You must first create all sites on the staging server, then set up production sites with which they will sync.
Ektron recommends logging into the main site then synchronizing it and all multi-sites from there.
Setting up eSync in a Multi-Site Environment
To set up eSync in a multi-site environment, follow these steps.
Warning! Back up your database before beginning this procedure!
1. Set up all sites on the staging server, following the instructions in
2. Install an Ektron CMS400.NET min site on each production server that will host a site. To do this, run the Ektron CMS400.NET base installation file. (For more information, see the Ektron CMS400.NET Setup manual.)
3. Install security certificates between the staging server and all production servers. This procedure is described in Managing eSync Security Certificates.
4. Sign on to the staging server.
5. In the Ektron CMS400.NET Workarea, go to Settings > Configuration > Synchronization.
6. The View All Synchronization Configurations screen appears.
7. Click Add ( ).
).
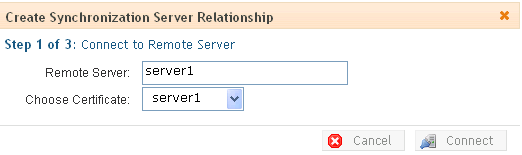
8. The Create Synchronization Server Relationship screen appears.
Note: If you see the following error, The system cannot find the file specified, you must set up security certificates. See Also: Managing eSync Security Certificates
9. Use the following table to complete the screen.
Warning! The first time you sync a Ektron CMS400.NET Web site, all of its data is overwritten. Make sure that no important information resides on the production server before beginning the first sync.
|
Field |
Description |
|
Remote Server |
Select a production server by choosing the path to the site’s physical location on the remote server. |
|
Choose Certificate |
If you selected a single server above, its name appears here. Proceed to the next step. If you selected a domain or IP address above, click the dropdown arrow to view all servers whose client security certificates reside on this server. Then, select the server with which you want to set up an eSync relationship. |
10. Click Connect.
11. After you connect to the production server, all eligible databases on it appear. The top one has a green check mark, indicating it is selected by default.
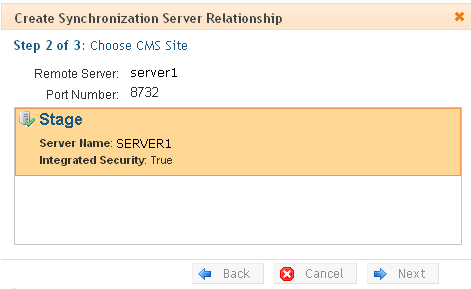
12. Click the database with which you want to sync. When you do, a green check mark appears on it, and its background color changes.
13. Click Next.
14. A new screen appears, showing both servers and allowing you to change the direction of the initial database copy. Make sure you are copying from staging to production.
Because the staging server is multi-site, the screen’s staging server area has a Site Path pulldown field (circled below), which lets you select a site.
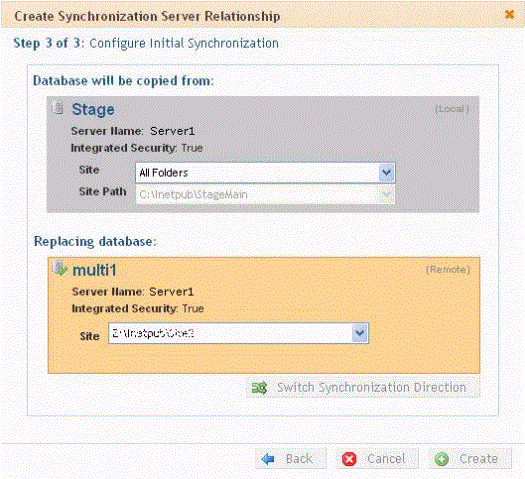
15. When you are satisfied, click Create. This sets up the server configuration but does not launch the initial sync.
16. The View All Synchronization Configurations screen appears with the new configuration.
If you are ready to overwrite the production database with the staging one, click Start Initial Sync ( ).
).
17. A confirmation screen appears.
18. A screen monitors the sync’s progress.
19. The initial sync creates a default profile, which appears on the View All Synchronization Configurations screen.
20. Set up and launch sync profiles to sync workarea files and templates on the staging server with those on the production server. (This is described in Setting up eSync Profiles and Running a Sync.) For synchronization direction, choose Upload.
Setting up Staging Multi-sites
By default, if you sign on to a staging server then insert library items (images, quicklinks, etc.) into content, the path to those items includes the production server.
For example, your server setup includes two multi-sites: sales.ektron.com and support.ektron.com.
Note: The multi-site names are defined in the site’s folder properties screen’s Production Domain field, as described in ”Step 3: Assign Multi-Site Capabilities in Ektron CMS400.NET.
So, any library links in the sales.ektron.com site’s content look like this: http://sales.ektron.com/template?id=id number.
However, you may wish to change library links so they refer to the staging server. This would help you verify that the linked items exist on the staging server.
To change library links so they refer to your staging server, follow these steps.
1. In the Ektron CMS400.NET Workarea, go to Settings > Configuration > Setup.
2. Click Edit ( ).
).
3. Check the This is a Staging Server check box.
4. Save the screen.
5. Go to Content > the staging site folder.
6. Choose View > Folder Properties.
7. Click Edit ( ).
8. Scroll down to the section labeled Multi-Site Domain Configuration:
9. In the Staging Domain field, enter the URL of your staging server.
10. Save the screen.
From now on, when a user signs on to the staging server and works with library links, the links include the staging server instead of the production server.


![]()